국비학원에서 대부분 배우는 JDBC와
현재 실무에서 많이 쓰이는 JPA를 비교해보는 간단한 CRUD 실습을 진행해보겠다.
🎫 JDBC 개념 정리글
🎫 JPA 개념 정리글
2021.07.25 - [Backend/Spring] - JPA (JPA개념 / JPA 입문 / 스프링부트 / JPA 책 추천 )
1. 개발환경 구축
maven / java11 / spring boot 2.7.4
- spring web
- spring boot dev tools
- spring data jpa
- lombok
- h2
- spring data jdbc

먼저 JDBC로 DB와 연결해 CRUD 코드를 짜보겠다.
2. application.yaml DB 설정 + 초기데이터 입력
|
1
2
3
4
5
6
7
8
9
|
spring:
datasource:
url: jdbc:h2:mem:testdb
driver-class-name: org.h2.Driver
username:
h2:
console:
enabled: true
|
cs |
DB설정을 해줬고 서버시작과 함께 초기 데이터가 들어가도록
resource 아래 data.sql을 작성해줬다.

|
1
2
3
4
5
6
7
8
9
10
11
12
13
14
15
|
create table person
(
id integer not null,
name varchar(255) not null,
location varchar(255),
birth_date timestamp,
primary key(id)
);
INSERT INTO PERSON (ID, NAME, LOCATION, BIRTH_DATE )
VALUES(10001, 'Jenny', 'Seoul',CURRENT_DATE());
INSERT INTO PERSON (ID, NAME, LOCATION, BIRTH_DATE )
VALUES(10002, 'James', 'New York',CURRENT_DATE());
INSERT INTO PERSON (ID, NAME, LOCATION, BIRTH_DATE )
VALUES(10003, 'Jin', 'Amsterdam',CURRENT_DATE());
|
cs |
💡 Initialize a Database Using Basic SQL Scripts
Spring Boot can automatically create the schema (DDL scripts) of your JDBC DataSource or R2DBC ConnectionFactory and initialize it (DML scripts). It loads SQL from the standard root classpath locations:
schema.sql and data.sql, respectively.
“How-to” Guides
Spring Boot has no mandatory logging dependency, except for the Commons Logging API, which is typically provided by Spring Framework’s spring-jcl module. To use Logback, you need to include it and spring-jcl on the classpath. The recommended way to do th
docs.spring.io

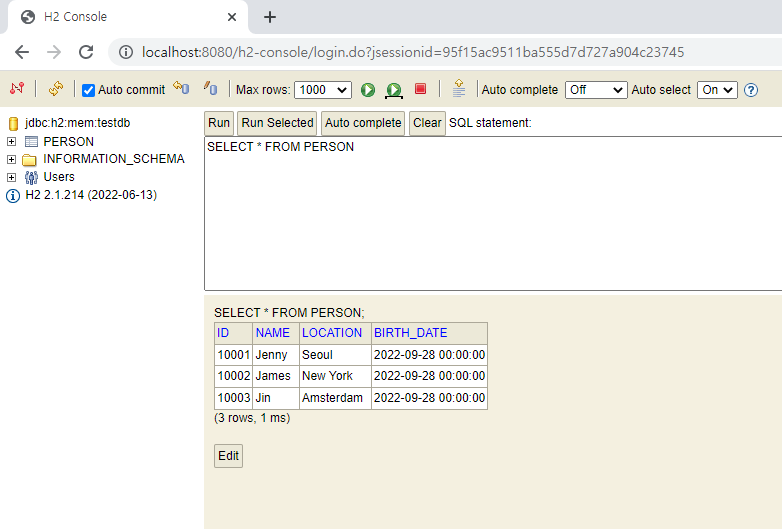
서버실행시 h2 DB에 테이블 생성과 데이터가 잘 들어가진 것을 확인할 수 있다.
3. JDBC 주입받은 Dao 생성
Dao 생성 전에 일단 DB에서 가져온 값을 담아줄 Person 객체를 하나 만들어줬다.
생성자, getter&setter, toString도 넣어줬다.
|
1
2
3
4
5
6
7
8
9
10
11
12
13
14
15
16
17
18
19
20
21
22
23
24
25
26
27
28
29
30
31
32
33
34
35
36
37
38
39
40
41
42
43
44
45
46
47
48
49
50
51
52
53
54
55
56
57
58
59
60
61
62
63
64
65
66
67
68
69
|
package com.udemy.jpa_study.domain;
import java.util.Date;
public class Person {
private int id;
private String name;
private String location;
private Date birthDate;
public Person() {}
public Person(int id, String name, String location, Date birthDate) {
this.id = id;
this.name = name;
this.location = location;
this.birthDate = birthDate;
}
public Person(String name, String location, Date birthDate) {
this.name = name;
this.location = location;
this.birthDate = birthDate;
}
public int getId() {
return id;
}
public void setId(int id) {
this.id = id;
}
public String getName() {
return name;
}
public void setName(String name) {
this.name = name;
}
public String getLocation() {
return location;
}
public void setLocation(String location) {
this.location = location;
}
public Date getBirthDate() {
return birthDate;
}
public void setBirthDate(Date birthDate) {
this.birthDate = birthDate;
}
@Override
public String toString() {
return "\nPerson{" +
"id=" + id +
", name='" + name + '\'' +
", location='" + location + '\'' +
", birthDate=" + birthDate +
'}';
}
}
|
cs |
|
1
2
3
4
5
6
7
8
9
10
11
12
13
14
15
16
17
18
19
20
21
22
23
24
25
26
27
28
29
30
31
32
33
34
35
36
37
38
39
40
|
import com.udemy.jpa_study.domain.Person;
import org.springframework.beans.factory.annotation.Autowired;
import org.springframework.jdbc.core.BeanPropertyRowMapper;
import org.springframework.jdbc.core.JdbcTemplate;
import org.springframework.stereotype.Repository;
import java.sql.Timestamp;
import java.util.List;
@Repository
public class PersonJdbcDao {
@Autowired
JdbcTemplate jdbcTemplate;
public List<Person> findAll() {
return jdbcTemplate.query("select * from person", new BeanPropertyRowMapper<Person>(Person.class));
}
public Person findById(int id) {
return jdbcTemplate.queryForObject("select * from person where id=?", new Object[] { id },
new BeanPropertyRowMapper<Person>(Person.class));
}
public int deleteById(int id) {
return jdbcTemplate.update("delete from person where id=?", new Object[] { id });
}
public int insert(Person person) {
return jdbcTemplate.update("insert into person (id, name, location, birth_date) " + "values(?, ?, ?, ?)",
new Object[] { person.getId(), person.getName(), person.getLocation(),
new Timestamp(person.getBirthDate().getTime()) });
}
public int update(Person person) {
return jdbcTemplate.update("update person " + " set name = ?, location = ?, birth_date = ? " + " where id = ?",
new Object[]{person.getName(), person.getLocation(), new Timestamp(person.getBirthDate().getTime()), person.getId()});
}
}
|
cs |
4. CommandLineRunner 상속
CommandLineRunner를 상속받아 서버 시작과 함께 같이 실행시킬 코드를 run에 담아줬다.
|
1
2
3
4
5
6
7
8
9
10
11
12
13
14
15
16
17
18
19
20
21
22
23
24
25
26
27
28
29
30
31
32
33
|
import com.udemy.jpa_study.domain.Person;
import com.udemy.jpa_study.jdbc.PersonJdbcDao;
import org.slf4j.Logger;
import org.slf4j.LoggerFactory;
import org.springframework.beans.factory.annotation.Autowired;
import org.springframework.boot.CommandLineRunner;
import org.springframework.boot.SpringApplication;
import org.springframework.boot.autoconfigure.SpringBootApplication;
import java.util.Date;
@SpringBootApplication
public class SpringJdbcApplication implements CommandLineRunner {
private Logger logger = LoggerFactory.getLogger(this.getClass());
@Autowired
PersonJdbcDao dao;
public static void main(String[] args) {
SpringApplication.run(SpringJdbcApplication.class, args);
}
@Override
public void run(String... args) throws Exception {
logger.info("All users -> {}", dao.findAll());
logger.info("User id 10001 -> {}", dao.findById(10001));
logger.info("Deleting 10002 -> No of Rows Deleted - {}", dao.deleteById(10002));
logger.info("Inserting 10004 -> {}",dao.insert(new Person(10004, "Joe", "Berlin", new Date())));
logger.info("Update 10003 -> {}", dao.update(new Person(10003, "JJ", "Ulsan", new Date())));
}
}
|
cs |

로그도 잘 뜨고

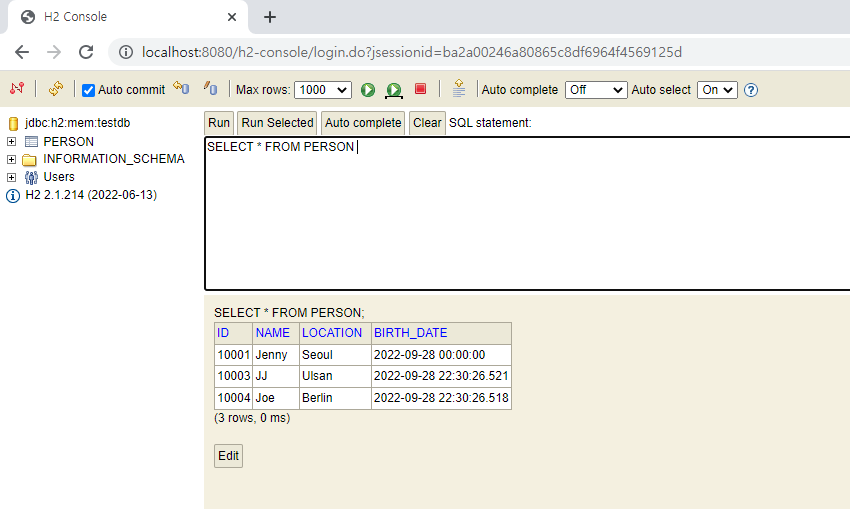
데이터도 잘 들어가고 업데이트되고 삭제된걸 확인할 수 있다.
이번에는 똑같은 CRUD 작업을 JPA로 진행해본다.
5. application.yaml DB 설정
jpa 설정을 추가해줬다.
spring.defer-datasource-initialization:true 는 data.sql 스크립트를 실행하고자할때 true로 설정해주면 된다.
이 설정이 왜 필요하냐면 Spring boot 2.4에서 2.5로 업데이트 되면서 하이버네이트 초기화전에 스크립트가 실행되며 오류가 발생하게 되기 떄문이다.
show-sql은 sql 명령이 생기면 콘솔창에 보여주겠다는 설정이다.
|
1
2
3
4
5
6
7
8
9
10
11
12
13
|
spring:
datasource:
url: jdbc:h2:mem:testdb
driver-class-name: org.h2.Driver
username:
h2:
console:
enabled: true
jpa:
defer-datasource-initialization: true
show-sql: true
|
cs |
By default, data.sql scripts are now run before Hibernate is initialized. This aligns the behavior of basic script based initialization with that of Flyway and Liquibase. If you want to use data.sql to populate a schema created by Hibernate, set spring.jpa.defer-datasource-initialization to true.
https://github.com/spring-projects/spring-boot/wiki/Spring-Boot-2.5-Release-Notes
그리고 data.sql에 있던 person 테이블 생성해주는 create문은 삭제해준다.
서버가 구동되고 JPA가 자동으로 만들어줄것이기 때문.. 안해주면 오류남
Caused by: org.h2.jdbc.JdbcSQLSyntaxErrorException: Table "PERSON" already exists; SQL statement:
6. Person 객체 Lombok 추가
|
1
2
3
4
5
6
7
8
9
10
11
12
13
14
15
16
17
18
19
20
21
22
23
24
|
import lombok.*;
import javax.persistence.Entity;
import javax.persistence.Id;
import javax.persistence.NamedQuery;
import java.util.Date;
@Entity
@Getter
@Setter
@ToString
@AllArgsConstructor
@NoArgsConstructor
@NamedQuery(name="find_all_persons", query = "select p from Person p")
public class Person {
@Id
private int id;
private String name;
private String location;
private Date birthDate;
}
|
cs |
@Entity : 엔티티로 만들어주는 어노테이션 > 테이블 자동 생성됨
@NoArgsConstructor : 기본 생성자
@AllArgsConstructor : 모든 필드를 파라미터로 받는 생성자
@NamedQuery : 정적쿼리 / 미리 정의해둔 쿼리
7. PersonRepository 생성
|
1
2
3
4
5
6
7
8
9
10
11
12
13
14
15
16
17
18
19
20
21
22
23
24
25
26
27
28
29
30
31
32
33
34
35
36
37
38
|
import org.springframework.stereotype.Repository;
import org.springframework.transaction.annotation.Transactional;
import javax.persistence.EntityManager;
import javax.persistence.PersistenceContext;
import javax.persistence.TypedQuery;
import java.util.List;
@Repository
@Transactional
public class PersonJpaRepository {
@PersistenceContext
EntityManager em;
public List<Person> findAll() {
TypedQuery<Person> namedQuery = em.createNamedQuery("find_all_persons", Person.class);
return namedQuery.getResultList();
}
public Person findById(int id) {
return em.find(Person.class, id);
}
public Person update(Person person) {
return em.merge(person);
}
public Person insert(Person person) {
return em.merge(person);
}
public void deleteById(int id) {
Person person = findById(id);
em.remove(person);
}
}
|
cs |
@PersistenceContext : 영속성 컨테스트 / 엔티티를 영구 저장하는 환경으로 스프링 컨테이너에서 빈을 찾아 주입시켜주는 역할을 한다. 엔티티매니저는 엔티티를 관리하고 데이터 베이스와 통신해 CRUD 작업을 해준다.
find, merge, remove는 기본적으로 엔티티매니저가 제공하는 것들이고
createNamedQuery는 엔티티에서 미리 정의해둔 쿼리를 가져다가 쓸거라는 것이다.
8. JPA Application 추가
이제 서버를 띄운 후 바로 실행시킬 코드를 run메소드에 담아줬다.
|
1
2
3
4
5
6
7
8
9
10
11
12
13
14
15
16
17
18
19
20
21
22
23
24
25
26
27
28
29
30
|
import org.slf4j.Logger;
import org.slf4j.LoggerFactory;
import org.springframework.beans.factory.annotation.Autowired;
import org.springframework.boot.CommandLineRunner;
import org.springframework.boot.SpringApplication;
import org.springframework.boot.autoconfigure.SpringBootApplication;
import java.util.Date;
@SpringBootApplication
public class SpringJpaApplication implements CommandLineRunner {
private Logger logger = LoggerFactory.getLogger(this.getClass());
@Autowired
PersonJpaRepository repository;
public static void main(String[] args) {
SpringApplication.run(SpringJpaApplication.class, args);
}
@Override
public void run(String... args) throws Exception {
logger.info("All users -> {}", repository.findAll());
logger.info("User id 10001 -> {}", repository.findById(10001));
repository.deleteById(10002);
logger.info("Inserting -> {}", repository.insert(new Person(10004, "Julia", "Berlin", new Date())));
logger.info("Update 10003 -> {}", repository.update(new Person(10003, "Jong", "Ulsan", new Date())));
}
}
|
cs |

로그도 잘 뜨고

데이터도 잘 들어가고 업데이트되고 삭제된걸 확인할 수 있다.
같은 코드인데 JPA를 통해 SQL문을 몰라도 작업을 할 수 있어진다. 이로써 보다 객체 지향적인 개발이 가능해졌다.
소스는 여기
https://github.com/recordbuffer/TIL/tree/main/Spring_Boot/jpa_study
GitHub - recordbuffer/TIL: Today I Learned
Today I Learned. Contribute to recordbuffer/TIL development by creating an account on GitHub.
github.com
참고
Master Hibernate and JPA with Spring Boot in 100 Steps
Learn Hibernate, JPA (Java Persistence API) and Spring Data JPA using Spring and Spring Boot
www.udemy.com
'JAVA > JPA' 카테고리의 다른 글
| [JPA] ManyToOne, OneToMany 연관관계 (mappedby / fetchType) (0) | 2022.10.18 |
|---|---|
| [JPA] OneToOne 연관관계 (mappedby / fetchType) (0) | 2022.10.14 |
| [JPA] Entity 생성일시 수정일시 자동 입력 방법 2가지 (@CreatedDate vs @CreationTimestamp) (0) | 2022.10.04 |
| [JPA] 영속성 관리 (Entity Manager / Persistence Context / 엔티티 생명주기) (2) | 2022.09.29 |
| [JPA] JAVA ORM JPA (JPA개념 / JPA 입문 / 스프링부트 / JPA 책 추천 ) (0) | 2021.07.25 |


댓글