[JPA] 다중 Datasource 구성하기 (Spring boot Multi Datasource / DB 여러개 설정)
프로젝트를 진행하던 중 여러개의 DB에서 데이터를 가져와야하거나 같은 DB지만 다른 스키마인 경우가 있었다.
이럴 때는 다중 Datasource를 설정해주면 된다.
코드로 구현해봤다.
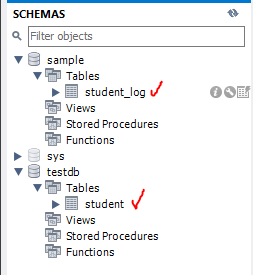
mysql의 'testdb'의 student 테이블이 있다.
또 'sample'의 student_log 테이블이 있다.
이 데이터들을 하나의 프로젝트에서 쓰고 싶다.
1. 스프링 부트 프로젝트 셋업
일단 일반적인 스프링부트 프로젝트를 만들어줬다.
build.gradle
plugins {
	id 'java'
	id 'org.springframework.boot' version '2.7.12'
	id 'io.spring.dependency-management' version '1.0.15.RELEASE'
}

group = 'com.study'
version = '0.0.1-SNAPSHOT'
sourceCompatibility = '11'

configurations {
	compileOnly {
		extendsFrom annotationProcessor
	}
}

repositories {
	mavenCentral()
}

dependencies {
	implementation 'org.springframework.boot:spring-boot-starter-data-jpa'
	compileOnly 'org.projectlombok:lombok'
	runtimeOnly 'com.mysql:mysql-connector-j'
	annotationProcessor 'org.projectlombok:lombok'
	testImplementation 'org.springframework.boot:spring-boot-starter-test'
}

tasks.named('test') {
	useJUnitPlatform()
}
mysql, lombok, jpa 만 추가해줬다.
application.yaml
spring:
  jpa:
    hibernate:
      show-sql: true
      ddl-auto: update
    properties:
      hibernate:
        format_sql: true

  datasource:
    driver-class-name: com.mysql.cj.jdbc.Driver
    url: jdbc:mysql://127.0.0.1:3306/testdb
    username: test
    password: test
일단은 student 테이블이 있는 testdb의 정보만 설정해줬다.
2. Student 정보 가져오기
미리 testdb에 'student'테이블을 만들어 값도 넣어줬다.
CREATE TABLE `student` (
  `id` bigint NOT NULL AUTO_INCREMENT,
  `email` varchar(255) DEFAULT NULL,
  `name` varchar(255) DEFAULT NULL,
  PRIMARY KEY (`id`)
) ENGINE=InnoDB AUTO_INCREMENT=4 DEFAULT CHARSET=utf8mb3

INSERT INTO testdb.student(email,name) VALUES('hong@sample.com','홍길동');
INSERT INTO testdb.student(email,name) VALUES('gogogo@sample.com','고길동');
INSERT INTO testdb.student(email,name) VALUES('hahuhohi@sample.com','허균');
Studnet
테이블과 맞게 student 도메인을 만들어줬다.
package com.study.advanced_jpa.service.domain;

import lombok.Getter;
import lombok.Setter;

import javax.persistence.Entity;
import javax.persistence.GeneratedValue;
import javax.persistence.GenerationType;
import javax.persistence.Id;

@Entity
@Getter
@Setter
public class Student {
    @Id
    @GeneratedValue(strategy = GenerationType.IDENTITY)
    private Long id;
    private String name;
    private String email;

    @Override
    public String toString() {
        return "Student{" +
                "id=" + id +
                ", name='" + name + '\'' +
                ", email='" + email + '\'' +
                '}';
    }
}
StudentRepository
jparepository를 상속받는 repository도 만들어줬다.
package com.study.advanced_jpa.service.repository;

import com.study.advanced_jpa.service.domain.Student;
import org.springframework.data.jpa.repository.JpaRepository;
import org.springframework.stereotype.Repository;

@Repository
public interface StudentRepository extends JpaRepository<Student, Long> {
}
프로젝트가 실행되면 바로 student 정보를 가져오도록 CommandLineRunner를 implements 했다.
AdvancedJpaApplication
package com.study.advanced_jpa;

import com.study.advanced_jpa.service.domain.Student;
import com.study.advanced_jpa.service.repository.StudentRepository;
import org.springframework.boot.CommandLineRunner;
import org.springframework.boot.SpringApplication;
import org.springframework.boot.autoconfigure.SpringBootApplication;

import java.util.List;

@SpringBootApplication
public class AdvancedJpaApplication implements CommandLineRunner {

	private final StudentRepository studentRepository;

	public AdvancedJpaApplication(StudentRepository studentRepository) {
		this.studentRepository = studentRepository;
	}

	public static void main(String[] args) {
		SpringApplication.run(AdvancedJpaApplication.class, args);
	}

	@Override
	public void run(String... args) throws Exception {
		List<Student> students = studentRepository.findAll();
		System.out.println("--------[ Student ]--------");
		students.forEach(s -> {
			System.out.println(s.toString());
		});
     	System.out.println("---------------------------");
	}
}
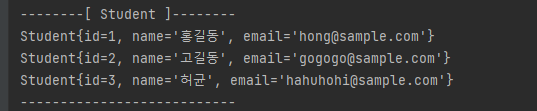
이대로 프로젝트를 실행시키면 학생 정보를 findAll() 해 와 뿌려준다.
3. Student_log 정보 가져오기
이제 다중 datasource를 구성해 sample 스키마의 student_log 테이블의 값들을 가져와보자.
일단 먼저 student_log 테이블을 만들어주고 값도 넣어줬다.
CREATE TABLE `sample`.`student_log` (
  `log_id` bigint NOT NULL AUTO_INCREMENT,
  `email` varchar(255) NOT NULL,
  `ip` varchar(15) DEFAULT NULL,
  `log_date` datetime,
  PRIMARY KEY (`log_id`)
) ENGINE=InnoDB AUTO_INCREMENT=4 DEFAULT CHARSET=utf8mb3

INSERT INTO sample.student_log(email,ip,log_date)
VALUES
('hong@sample.com', '127.0.0.1', '2023-06-17 11:27:09'),
('hong@sample.com', '127.0.0.1', '2023-06-17 11:39:19'),
('hong@sample.com', '127.0.0.1', '2023-06-17 11:47:37'),
('hong@sample.com', '127.0.0.1', '2023-06-17 11:50:11'),
('gogogo@sample.com', '127.0.0.1', '2023-06-17 11:50:13'),
('hahuhohi@sample.com', '127.0.0.1', '2023-06-17 11:52:19'),
('hahuhohi@sample.com', '127.0.0.1', '2023-06-17 12:11:11'),
('gogogo@sample.com', '127.0.0.1', '2023-06-17 13:10:13')
🌟 application.yaml 에 datasource 추가
spring:
  jpa:
    hibernate:
      show-sql: true
      ddl-auto: update
    properties:
      hibernate:
        format_sql: true

  datasource:
    driver-class-name: com.mysql.cj.jdbc.Driver
    jdbc-url: jdbc:mysql://127.0.0.1:3306/testdb
    username: test
    password: test

  log-datasource:
    driver-class-name: com.mysql.cj.jdbc.Driver
    jdbc-url: jdbc:mysql://127.0.0.1:3306/sample
    username: test
    password: test
원래 datasource와 같은 라인에 다른 이름으로 하나 더 추가해줬다.
이름은 마음대로 상관은 없지만 두개의 datasource가 중복되는 이름을 가질 수는 없다.
또 url 을 jdbc-url로 바꿔줘야 한다.
🌟 Configuration 추가
설정파일을 만들어줘야 한다.
datasource가 두개니까 두개 만들어준다.
DatasourceConfig
package com.study.advanced_jpa.config;

import org.springframework.boot.context.properties.ConfigurationProperties;
import org.springframework.boot.jdbc.DataSourceBuilder;
import org.springframework.context.annotation.Bean;
import org.springframework.context.annotation.Configuration;
import org.springframework.context.annotation.Primary;
import org.springframework.data.jpa.repository.config.EnableJpaRepositories;
import org.springframework.orm.jpa.JpaTransactionManager;
import org.springframework.orm.jpa.LocalContainerEntityManagerFactoryBean;
import org.springframework.orm.jpa.vendor.HibernateJpaVendorAdapter;
import org.springframework.transaction.PlatformTransactionManager;

import javax.sql.DataSource;

@EnableJpaRepositories( // JPA Repository Bean 활성화
        basePackages = "com.study.advanced_jpa.service",
        entityManagerFactoryRef = "firstEntityManager",
        transactionManagerRef = "firstTransactionManager"
)
@Configuration
public class DatasourceConfig {
    @Primary    // Bean 우선순위 설정
    @Bean
    public LocalContainerEntityManagerFactoryBean firstEntityManager() {
        LocalContainerEntityManagerFactoryBean em = new LocalContainerEntityManagerFactoryBean();
        em.setDataSource(firstDataSource());
        em.setPackagesToScan(new String[] {"com.study.advanced_jpa.service.domain"});
        em.setJpaVendorAdapter(new HibernateJpaVendorAdapter());
        return em;
    }

    @Primary
    @Bean
    @ConfigurationProperties(prefix = "spring.datasource")
    public DataSource firstDataSource() {
        return DataSourceBuilder.create().build();
    }

    @Primary
    @Bean
    public PlatformTransactionManager firstTransactionManager() {
        JpaTransactionManager transactionManager = new JpaTransactionManager();
        transactionManager.setEntityManagerFactory(firstEntityManager().getObject());
        return transactionManager;
    }
}
- EntityManagerFactory 설정
- Datasource 설정
- Transaction 설정
우리는 Spring Data JPA를 사용하고 JPA를 통해 실제 DB와 소통할 것이기 때문에 @EnableJpaRepositories 로 JPA Repository를 활성화해줘야 한다.
basePackage를 설정해줘 스캔할 패키지를 지정해준다.
entityManagerFactoryRef 와 transactionManagerRef 를 지정해줘 이후 코드에서 사용할 수 있다.
예를 들어 어떤 메서드에 트랜잭션처리를 해주고 싶은데
@Transactional 이대로 쓰면 안되고
@Transactional(value = "firstTransactionManager") 이런식으로 불러와 사용할 수 있다.
@Primary 를 통해 bean의 우선순위를 해당 datasource에 둔다고 선언할 수 있다.
LogDatasourceConfig
package com.study.advanced_jpa.config;

import org.springframework.boot.context.properties.ConfigurationProperties;
import org.springframework.boot.jdbc.DataSourceBuilder;
import org.springframework.context.annotation.Bean;
import org.springframework.context.annotation.Configuration;
import org.springframework.context.annotation.Primary;
import org.springframework.data.jpa.repository.config.EnableJpaRepositories;
import org.springframework.orm.jpa.JpaTransactionManager;
import org.springframework.orm.jpa.LocalContainerEntityManagerFactoryBean;
import org.springframework.orm.jpa.vendor.HibernateJpaVendorAdapter;
import org.springframework.transaction.PlatformTransactionManager;

import javax.sql.DataSource;

@EnableJpaRepositories(
        basePackages = "com.study.advanced_jpa.log",
        entityManagerFactoryRef = "secondEntityManager",
        transactionManagerRef = "secondTransactionManager"
)
@Configuration
public class LogDatasourceConfig {
    @Bean
    public LocalContainerEntityManagerFactoryBean secondEntityManager() {
        LocalContainerEntityManagerFactoryBean em = new LocalContainerEntityManagerFactoryBean();
        em.setDataSource(secondDataSource());
        em.setPackagesToScan(new String[] {"com.study.advanced_jpa.log.domain"});
        em.setJpaVendorAdapter(new HibernateJpaVendorAdapter());
        return em;
    }

    @Bean
    @ConfigurationProperties(prefix = "spring.log-datasource")
    public DataSource secondDataSource() {
        return DataSourceBuilder.create().build();
    }

    @Bean
    public PlatformTransactionManager secondTransactionManager() {
        JpaTransactionManager transactionManager = new JpaTransactionManager();
        transactionManager.setEntityManagerFactory(secondEntityManager().getObject());
        return transactionManager;
    }
}
거의 비슷하지만 @Primary가 빠졌고 스캔되는 패키지의 경로, 설정된 이름 등이 다르다.
StudentLog
package com.study.advanced_jpa.log.domain;

import lombok.Getter;
import lombok.Setter;

import javax.persistence.*;
import java.sql.Timestamp;

@Entity
@Getter
@Setter
@Table(name = "student_log")
public class StudentLog {
    @Id
    @GeneratedValue(strategy = GenerationType.IDENTITY)
    @Column(name = "log_id")
    private Long logId;
    private String email;
    private String ip;
    @Column(name = "log_date")
    private Timestamp logDate;

    @Override
    public String toString() {
        return "StudentLog{" +
                "logId=" + logId +
                ", email='" + email + '\'' +
                ", ip='" + ip + '\'' +
                ", logDate=" + logDate +
                '}';
    }
}
StudentLog 역시 테이블과 맞게 만들어준다.
LogRepository
package com.study.advanced_jpa.log.repository;

import com.study.advanced_jpa.log.domain.StudentLog;
import org.springframework.data.jpa.repository.JpaRepository;
import org.springframework.stereotype.Repository;

import java.util.List;

@Repository
public interface LogRepository extends JpaRepository<StudentLog, Long> {

    List<StudentLog> findAllByEmail(String email);
}
jparepository를 상속받는 repository도 만들어주고 email을 통해 findAll하는 메서드도 하나 만들어줬다.
AdvancedJpaApplication
package com.study.advanced_jpa;

import com.study.advanced_jpa.log.domain.StudentLog;
import com.study.advanced_jpa.log.repository.LogRepository;
import com.study.advanced_jpa.service.domain.Student;
import com.study.advanced_jpa.service.repository.StudentRepository;
import org.springframework.boot.CommandLineRunner;
import org.springframework.boot.SpringApplication;
import org.springframework.boot.autoconfigure.SpringBootApplication;

import java.util.List;

@SpringBootApplication
public class AdvancedJpaApplication implements CommandLineRunner {

    private final StudentRepository studentRepository;
    private final LogRepository logRepository;

    public AdvancedJpaApplication(StudentRepository studentRepository, LogRepository logRepository) {
        this.studentRepository = studentRepository;
        this.logRepository = logRepository;
    }

    public static void main(String[] args) {
        SpringApplication.run(AdvancedJpaApplication.class, args);
    }

    @Override
    public void run(String... args) throws Exception {
        List<Student> students = studentRepository.findAll();


        students.forEach(s -> {
            System.out.println();
            System.out.println("--------[ Student ]--------");
            System.out.println(s.toString());

            System.out.println("--------[ Log ]--------");
            List<StudentLog> logs = logRepository.findAllByEmail(s.getEmail());
            logs.forEach(l -> {
                System.out.println(l.toString());
            });
            System.out.println("---------------------------");
        });
        System.out.println();

    }
}
그리고 student에서 가져온 email로 log를 출력하도록 간단히 코드를 작성해주고 실행해봤다.
결과를 확인해보면...
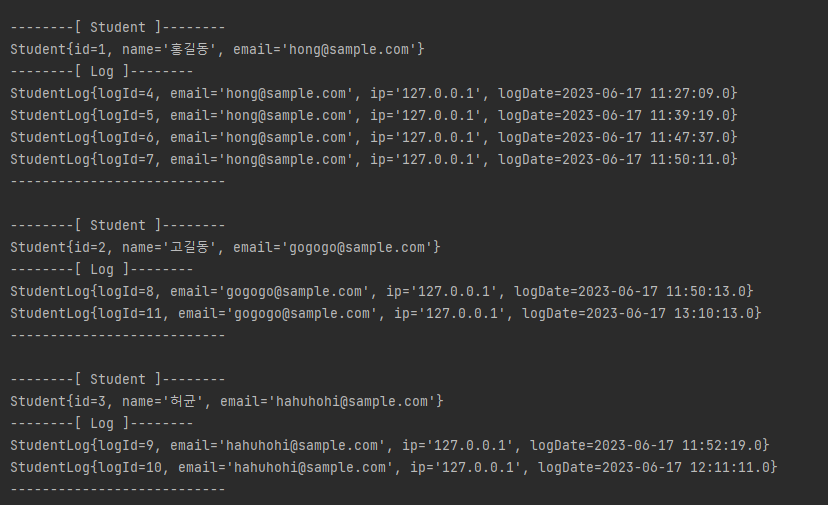
성공적이다.
이렇게 하나의 프로젝트에서 여러개의 DB에 접근해 데이터를 가져와 사용할 수 있게 되었다.
코드
https://github.com/recordbuffer/TIL/tree/main/Spring_Boot/advanced_jpa
GitHub - recordbuffer/TIL: Today I Learned
Today I Learned. Contribute to recordbuffer/TIL development by creating an account on GitHub.
github.com
참고
https://www.baeldung.com/spring-data-jpa-multiple-databases
https://zzang9ha.tistory.com/439