[Spring] Spring Security + OAuth2.0으로 소셜 로그인 구현 ver 1. SSR (OAuth2.0 / 구글 로그인 / 네이버 로그인
2023.01.09 - [Backend/Spring] - [Spring] Spring Security 기본 개념 (JWT / OAuth2.0 / 동작 방식 / 구성 요소) [Spring] Spring Security 기본 개념 (JWT / OAuth2.0 / 동작 방식 / 구성 요소) JWT (Jason Web Token) 유저 인증, 식별하
datamoney.tistory.com
이번에는 SPA를 통한 소셜로그인이다.
프로젝트는 Spring Boot + Vue.js를 사용한다.
이전 SSR과는 다르게 신경써야할 부분들이 더 있다.
Spring Boot + Vue.js 이 둘은 Rest api를 통해 통신한다.
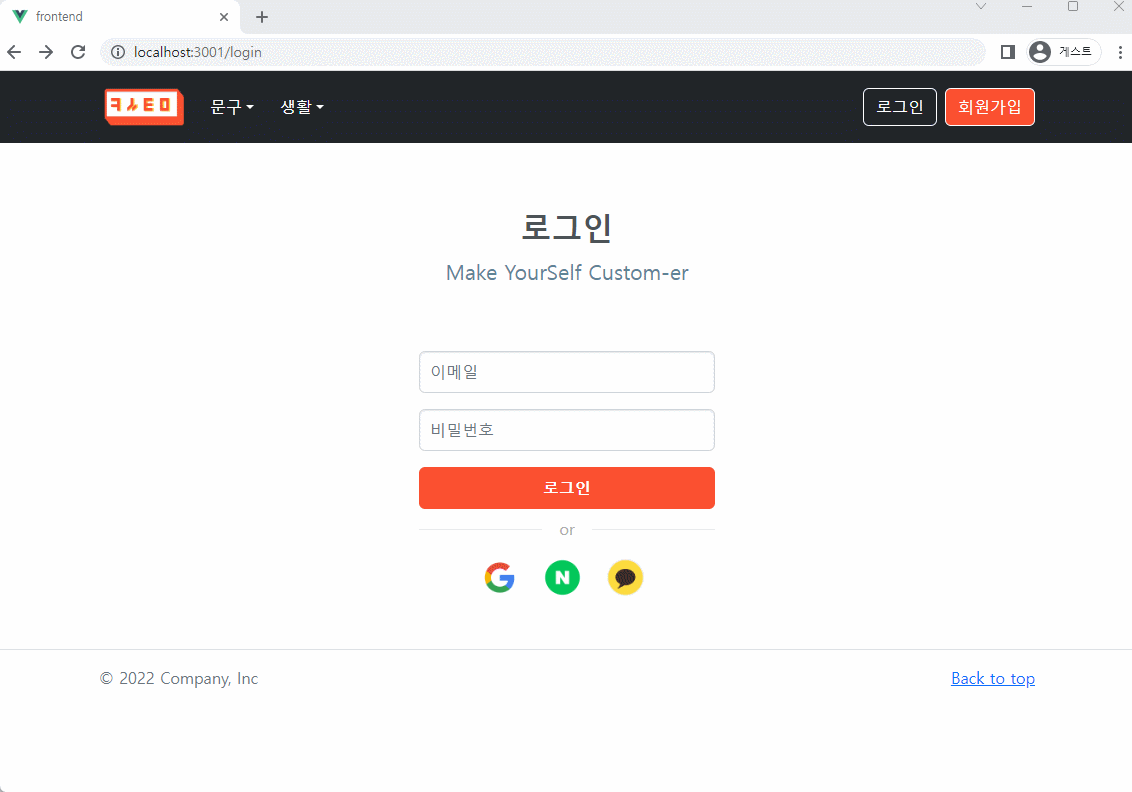
프론트 단부터 만들어준다.
가장 먼저 로그인 화면과 소셜 로그인 버튼을 만들어줬다.
Login.vue

|
1
2
3
4
5
6
7
8
9
10
11
|
<div class="form-group d-flex justify-content-center">
<a href="http://localhost:8080/oauth2/authorize/google?redirect_uri=http://localhost:3001/oauth2/redirect">
<img class="bi me-2" width="55" height="55" src="../assets/google.png" />
</a>
<a href="http://localhost:8080/oauth2/authorize/naver?redirect_uri=http://localhost:3001/oauth2/redirect">
<img class="bi me-2" width="55" height="55" src="../assets/naver.png" />
</a>
<a href="http://localhost:8080/oauth2/authorize/kakao?redirect_uri=http://localhost:3001/oauth2/redirect">
<img class="bi me-2" width="55" height="55" src="../assets/kakao.png" />
</a>
</div>
|
cs |
소셜 로그인 버튼을 누르면 서버로 oauth2 로그인 요청을 보내주고 이후 응답으로 보내질 redirect_uri를 같이 써줬다.
routes.js
|
1
2
3
4
5
6
7
8
9
|
import VueRouter from 'vue-router';
(...)
import Redirect from "@/pages/Redirect";
const routes = [
{path: '/oauth2/redirect', component: Redirect}
]
|
cs |
redirect_uri로 들어가면 Redirect.vue로 넘어간다.
Redirect.vue
|
1
2
3
4
5
6
7
8
9
10
11
12
13
14
15
16
17
18
19
20
21
22
23
24
25
26
27
28
29
|
<template>
<div>
</div>
</template>
<script>
import router from "@/router";
import store from "@/store";
export default {
created() {
const token = this.$route.query.token
console.log('token',token)
if (token) {
store.commit('setToken', token);
sessionStorage.setItem('accessToken', token);
window.alert('로그인하였습니다');
router.push({path:'/'})
} else {
window.alert('로그인에 실패하였습니다.')
router.push({path:'/login'})
}
}
}
</script>
<style scoped>
</style>
|
cs |
로그인이 성공했다면 jwt가 올 것이고
아니라면 에러메시지가 올 것인데
이에 따라 로그인 성공과 실패를 응답해준다.
로그인이 성공했다면 그 상태를 store과 sessionStorage에 저장해 관리해준다.
store.js
|
1
2
3
4
5
6
7
8
9
10
11
12
13
14
15
16
17
|
import Vue from 'vue'
import Vuex from 'vuex'
Vue.use(Vuex)
const store = new Vuex.Store({
state: {
token: null
},
mutations: {
setToken(state, token) {
state.token = token;
}
}
})
export default store;
|
cs |
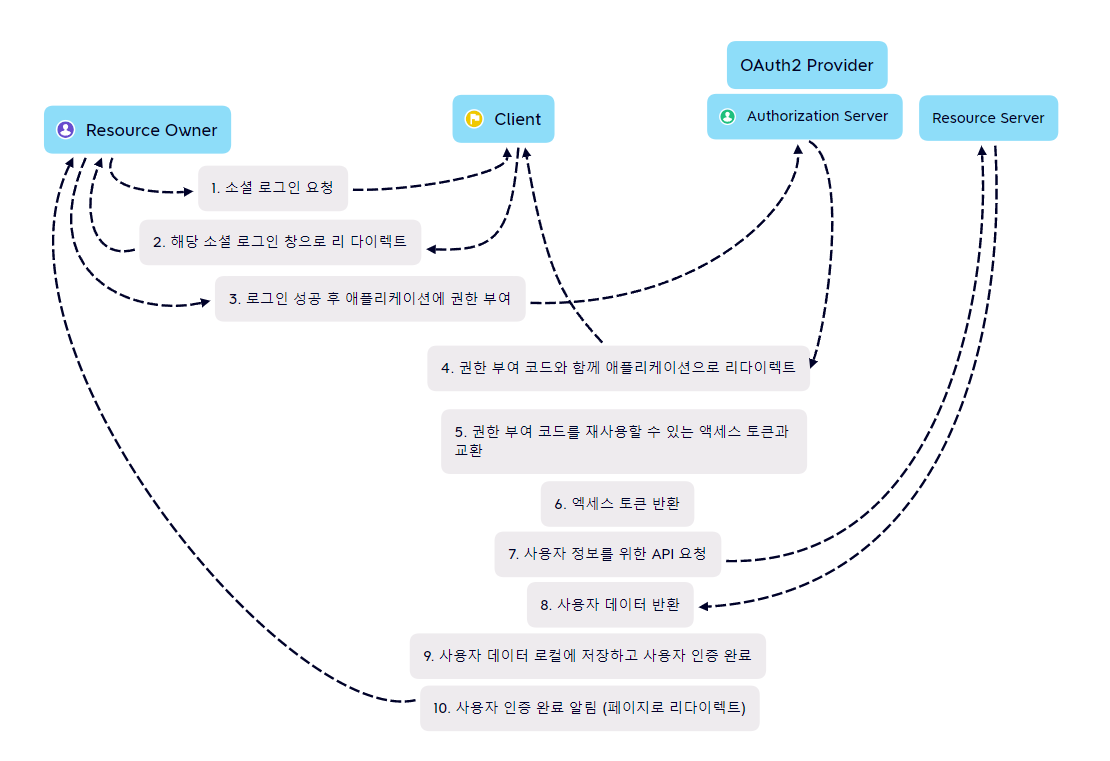
이제 다시 요청으로 가보자면 뒤에 redirect_url은 로그인을 요청하고 사용자 인증까지 모든 걸 완료후 보내지는 페이지를 말한다.
<a href="http://localhost:8080/oauth2/authorize/google?redirect_uri=http://localhost:3001/oauth2/redirect">
그래서 서버로 소셜 로그인 요청을 하면 어디로 가나면 바로 SecurityConfig다
SecurityConfig.java
|
1
2
3
4
5
6
7
8
9
10
11
12
13
14
15
16
17
18
19
20
21
22
23
24
25
26
27
28
29
30
31
32
33
34
35
36
37
38
39
40
41
42
43
44
45
46
47
48
49
50
51
52
53
54
55
56
|
@Configuration
@EnableWebSecurity
public class SecurityConfig {
private final JwtTokenProvider jwtTokenProvider;
private final CustomOAuth2UserService customOAuth2UserService;
private final OAuth2AuthenticationSuccessHandler oAuth2AuthenticationSuccessHandler;
private final OAuth2AuthenticationFailureHandler oAuth2AuthenticationFailureHandler;
public SecurityConfig(JwtTokenProvider jwtTokenProvider, CustomOAuth2UserService customOAuth2UserService, OAuth2AuthenticationSuccessHandler oAuth2AuthenticationSuccessHandler, OAuth2AuthenticationFailureHandler oAuth2AuthenticationFailureHandler) {
this.jwtTokenProvider = jwtTokenProvider;
this.customOAuth2UserService = customOAuth2UserService;
this.oAuth2AuthenticationSuccessHandler = oAuth2AuthenticationSuccessHandler;
this.oAuth2AuthenticationFailureHandler = oAuth2AuthenticationFailureHandler;
}
@Bean
public HttpCookieOAuth2AuthorizationRequestRepository cookieOAuth2AuthorizationRequestRepository() {
return new HttpCookieOAuth2AuthorizationRequestRepository();
}
@Bean
public BCryptPasswordEncoder encoder() {
return new BCryptPasswordEncoder();
}
@Bean
public SecurityFilterChain filterChain(HttpSecurity http) throws Exception {
http
.csrf().disable()
.sessionManagement().sessionCreationPolicy(SessionCreationPolicy.STATELESS)
.and()
.formLogin().disable()
.httpBasic().disable()
.authorizeRequests()
.antMatchers ("/api/**", "/login/**", "/oauth2/**").permitAll ()
.and()
.oauth2Login()
.authorizationEndpoint().baseUri("/oauth2/authorize")
.authorizationRequestRepository(cookieOAuth2AuthorizationRequestRepository())
.and()
.redirectionEndpoint()
.baseUri("/login/oauth2/code/**")
.and()
.userInfoEndpoint().userService(customOAuth2UserService)
.and()
.successHandler(oAuth2AuthenticationSuccessHandler)
.failureHandler(oAuth2AuthenticationFailureHandler)
.and()
.addFilterBefore(new JwtAuthenticationFilter(jwtTokenProvider), UsernamePasswordAuthenticationFilter.class);
return http.build();
}
}
|
cs |
우리의 소셜 로그인 요청이 (http://localhost:8080/oauth2/authorize/google)
oauth2Login 요청인 것을 확인한 스프링 시큐리티 체인이
그 이후의 일들을 진행해준다.
요청이 들어오면 HttpCookieOAuth2AuthorizationRequestRepository로 가서 authorization request를 저장한다.
권한 부여 과정을 진행하기 위해서는 그 권한 부여 요청이 지속되어야 한다.
⭐️⭐️⭐️ 2023.12.16 추가
Spring Boot 3.x 에서는 설정이 바뀌었다. 아래 포스팅에서 확인하세요...
[Spring] Spring Boot 3.x SecurityConfig 설정 (Spring Security + OAuth2.0)
업무를 하며 오랜만에 spring security를 다시 만지게 됐다. 신규 프로젝트라 내 마음대로 셋팅을 할 수 있어 기존 많이 쓰던 Java 11 + Spring Boot 2.x 대신 Java 17 + Spring Boot 3.x로 셋팅했다. 그리고 별생각
datamoney.tistory.com
HttpCookieOAuth2AuthorizationRequestRepository.java
|
1
2
3
4
5
6
7
8
9
10
11
12
13
14
15
16
17
18
19
20
21
22
23
24
25
26
27
28
29
30
31
32
33
34
35
36
37
|
@Component
public class HttpCookieOAuth2AuthorizationRequestRepository implements AuthorizationRequestRepository<OAuth2AuthorizationRequest> {
public static final String OAUTH2_AUTHORIZATION_REQUEST_COOKIE_NAME = "oauth2_auth_request";
public static final String REDIRECT_URI_PARAM_COOKIE_NAME = "redirect_uri";
private static final int cookieExpireSeconds = 180;
@Override
public OAuth2AuthorizationRequest loadAuthorizationRequest(HttpServletRequest request) {
return CookieUtils.getCookie(request, OAUTH2_AUTHORIZATION_REQUEST_COOKIE_NAME)
.map(cookie -> CookieUtils.deserialize(cookie, OAuth2AuthorizationRequest.class))
.orElse(null);
}
@Override
public void saveAuthorizationRequest(OAuth2AuthorizationRequest authorizationRequest, HttpServletRequest request, HttpServletResponse response) {
if (authorizationRequest == null) {
CookieUtils.deleteCookie(request, response, OAUTH2_AUTHORIZATION_REQUEST_COOKIE_NAME);
CookieUtils.deleteCookie(request, response, REDIRECT_URI_PARAM_COOKIE_NAME);
return;
}
CookieUtils.addCookie(response, OAUTH2_AUTHORIZATION_REQUEST_COOKIE_NAME, CookieUtils.serialize(authorizationRequest), cookieExpireSeconds);
String redirectUriAfterLogin = request.getParameter(REDIRECT_URI_PARAM_COOKIE_NAME);
if (StringUtils.isNotBlank(redirectUriAfterLogin)) {
CookieUtils.addCookie(response, REDIRECT_URI_PARAM_COOKIE_NAME, redirectUriAfterLogin, cookieExpireSeconds);
}
}
@Override
public OAuth2AuthorizationRequest removeAuthorizationRequest(HttpServletRequest request) {
return this.loadAuthorizationRequest(request);
}
public void removeAuthorizationRequestCookies(HttpServletRequest request, HttpServletResponse response) {
CookieUtils.deleteCookie(request, response, OAUTH2_AUTHORIZATION_REQUEST_COOKIE_NAME);
CookieUtils.deleteCookie(request, response, REDIRECT_URI_PARAM_COOKIE_NAME);
}
}
|
cs |
authorization request를 쿠키에 저장한다.
CookieUtils.java
|
1
2
3
4
5
6
7
8
9
10
11
12
13
14
15
16
17
18
19
20
21
22
23
24
25
26
27
28
29
30
31
32
33
34
35
36
37
38
39
40
41
42
43
44
45
46
47
48
49
|
public class CookieUtils {
public static Optional<Cookie> getCookie(HttpServletRequest request, String name) {
Cookie[] cookies = request.getCookies();
if (cookies != null && cookies.length > 0) {
for (Cookie cookie : cookies) {
if (cookie.getName().equals(name)) {
return Optional.of(cookie);
}
}
}
return Optional.empty();
}
public static void addCookie(HttpServletResponse response, String name, String value, int maxAge) {
Cookie cookie = new Cookie(name, value);
cookie.setPath("/");
cookie.setHttpOnly(true);
cookie.setMaxAge(maxAge);
response.addCookie(cookie);
}
public static void deleteCookie(HttpServletRequest request, HttpServletResponse response, String name) {
Cookie[] cookies = request.getCookies();
if (cookies != null && cookies.length > 0) {
for (Cookie cookie: cookies) {
if (cookie.getName().equals(name)) {
cookie.setValue("");
cookie.setPath("/");
cookie.setMaxAge(0);
response.addCookie(cookie);
}
}
}
}
public static String serialize(Object object) {
return Base64.getUrlEncoder()
.encodeToString(SerializationUtils.serialize(object));
}
public static <T> T deserialize(Cookie cookie, Class<T> cls) {
return cls.cast(SerializationUtils.deserialize(
Base64.getUrlDecoder().decode(cookie.getValue())));
}
}
|
cs |
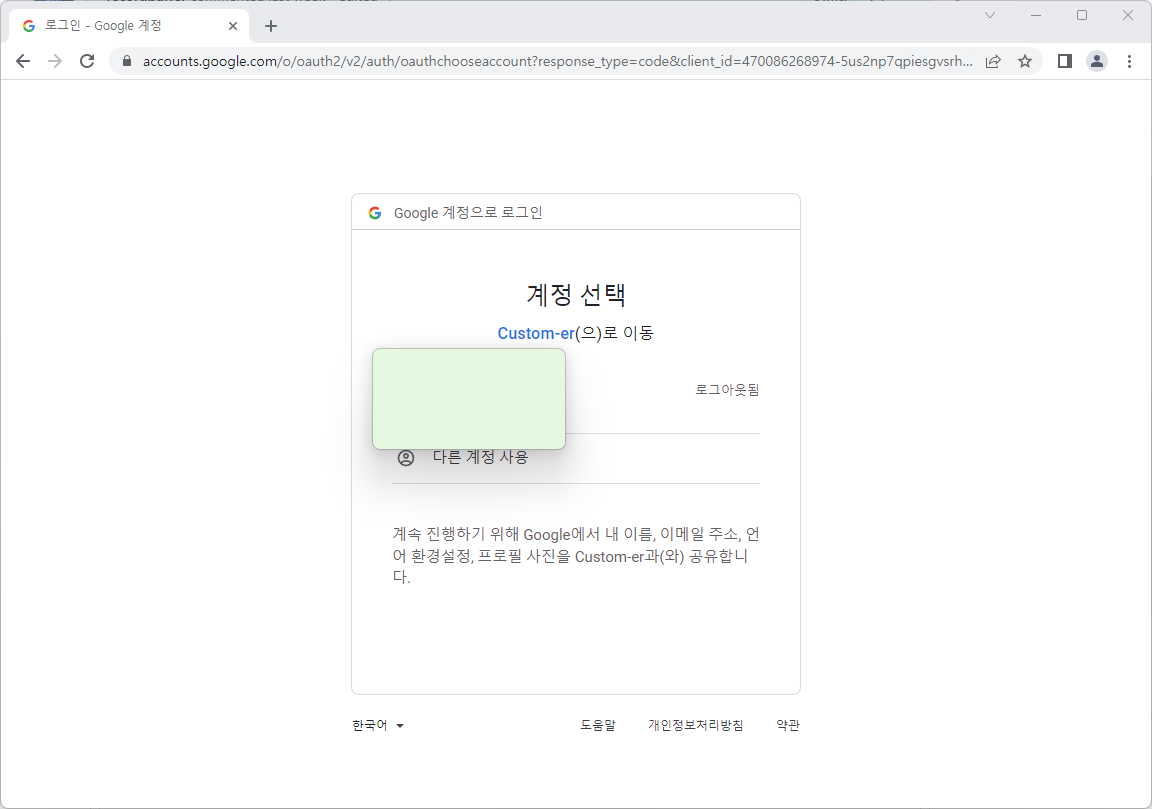
로그인 버튼을 누르면 해당 소셜 로그인 창으로 넘어간다.
로그인이 성공하면 미리 설정해둔 redirectionEndPoint url인 /login/oauth2/code/**로 넘어간다
그리고 CustomOAuth2UserService에 정의한대로 로직을 처리한다.
CustomOAuth2UserService.java
|
1
2
3
4
5
6
7
8
9
10
11
12
13
14
15
16
17
18
19
20
21
22
23
24
25
26
27
28
29
30
31
32
33
34
35
36
|
@Service
public class CustomOAuth2UserService implements OAuth2UserService<OAuth2UserRequest, OAuth2User> {
private final UserRepository userRepository;
public CustomOAuth2UserService(UserRepository userRepository) {
this.userRepository = userRepository;
}
@Override
public OAuth2User loadUser(OAuth2UserRequest userRequest) throws OAuth2AuthenticationException {
OAuth2UserService<OAuth2UserRequest, OAuth2User> delegate = new DefaultOAuth2UserService();
OAuth2User oAuth2User = delegate.loadUser(userRequest);
String registrationId = userRequest.getClientRegistration().getRegistrationId();
String userNameAttributeName = userRequest.getClientRegistration().getProviderDetails().getUserInfoEndpoint().getUserNameAttributeName();
OAuthAttributes attributes = OAuthAttributes.of(registrationId, userNameAttributeName, oAuth2User.getAttributes());
Users user = saveOrUpdate(attributes);
return new DefaultOAuth2User(
Collections.singleton(new SimpleGrantedAuthority(user.getRoleKey())),
attributes.getAttributes(),
attributes.getNameAttributeKey()
);
}
private Users saveOrUpdate(OAuthAttributes attributes) {
Users user = userRepository.findByEmail(attributes.getEmail())
.map(entity -> entity.update(attributes.getName(), attributes.getProvider()))
.orElse(attributes.toEntity());
return userRepository.save(user);
}
}
|
cs |
요청이 들어온 Provider을 구분해주고 유저 정보에 접근한다.
유저 정보는 OAuthAttributes라는 이름에서 Provider별로 Scope에 따라 정보를 담아 준다.
그리고 정보에 따라 유저를 생성해준다.
이 부분은 거의 저번 블로깅 내용과 비슷하다.
[Spring] Spring Security + OAuth2.0으로 소셜 로그인 구현 ver 1. SSR (OAuth2.0 / 구글 로그인 / 네이버 로그인
2023.01.09 - [Backend/Spring] - [Spring] Spring Security 기본 개념 (JWT / OAuth2.0 / 동작 방식 / 구성 요소) [Spring] Spring Security 기본 개념 (JWT / OAuth2.0 / 동작 방식 / 구성 요소) JWT (Jason Web Token) 유저 인증, 식별하
datamoney.tistory.com
다만 우리가 이 프로젝트에 SPA를 사용해서 JWT로 넘겨줄 것이기 때문에 session에 저장할 필요가 없다.
이 앞까지의 과정이 성공하면 OAuth2AuthenticationSuccessHandler로 처리해주고
실패하면 OAuth2AuthenticationFailureHandler로 처리해준다.
OAuth2AuthenticationSuccessHandler.java
|
1
2
3
4
5
6
7
8
9
10
11
12
13
14
15
16
17
18
19
20
21
22
23
24
25
26
27
28
29
30
31
32
33
34
35
36
37
38
39
40
|
@Component
public class OAuth2AuthenticationSuccessHandler extends SimpleUrlAuthenticationSuccessHandler {
private final JwtTokenProvider tokenProvider;
private final HttpCookieOAuth2AuthorizationRequestRepository httpCookieOAuth2AuthorizationRequestRepository;
public OAuth2AuthenticationSuccessHandler(JwtTokenProvider tokenProvider, HttpCookieOAuth2AuthorizationRequestRepository httpCookieOAuth2AuthorizationRequestRepository) {
this.tokenProvider = tokenProvider;
this.httpCookieOAuth2AuthorizationRequestRepository = httpCookieOAuth2AuthorizationRequestRepository;
}
@Override
public void onAuthenticationSuccess(HttpServletRequest request, HttpServletResponse response, Authentication authentication) throws IOException {
String targetUrl = determineTargetUrl(request, response, authentication);
clearAuthenticationAttributes(request, response);
getRedirectStrategy().sendRedirect(request, response, targetUrl);
}
protected String determineTargetUrl(HttpServletRequest request, HttpServletResponse response, Authentication authentication) {
Optional<String> redirectUri = CookieUtils.getCookie(request, REDIRECT_URI_PARAM_COOKIE_NAME)
.map(Cookie::getValue);
String targetUrl = redirectUri.orElse(getDefaultTargetUrl());
String token = tokenProvider.generateToken(authentication);
return UriComponentsBuilder.fromUriString(targetUrl)
.queryParam("token", token)
.build().toUriString();
}
protected void clearAuthenticationAttributes(HttpServletRequest request, HttpServletResponse response) {
super.clearAuthenticationAttributes(request);
httpCookieOAuth2AuthorizationRequestRepository.removeAuthorizationRequestCookies(request, response);
}
}
|
cs |
성공하면 jwt를 만들어 인가 요청에 저장된 uri로 응답해주고 인가 요청을 리셋해준다.
JwtTokenProvider.java
public String generateToken(Authentication authentication) {
    String authorities = authentication.getAuthorities().stream()
            .map(GrantedAuthority::getAuthority)
            .collect(Collectors.joining(","));

    //Access Token 생성
    return Jwts.builder()
            .setSubject(authentication.getName())
            .claim("auth", authorities)
            .setExpiration(new Date(System.currentTimeMillis()+ 1000 * 60 * 30))
            .signWith(key, SignatureAlgorithm.HS256)
            .compact();
}
jwt 토큰 생성에 관해서는 이전 블로깅 참고
[Spring] Spring Security JWT 로그인 구현 (HTTP Basic Authentication / Form Based Authentication / JWT)
스프링 시큐리티와 JWT를 이용한 로그인을 구현해보려 한다. ➡️ 개념 정리 2023.01.09 - [Backend/Spring] - [Spring] Spring Security 기본 개념 (JWT / OAuth2.0 / 동작 방식 / 구성 요소) [Spring] Spring Security 기본 개
datamoney.tistory.com
OAuth2AuthenticationFailureHandler.java
|
1
2
3
4
5
6
7
8
9
10
11
12
13
14
15
16
17
18
19
20
21
22
23
24
|
@Component
public class OAuth2AuthenticationFailureHandler extends SimpleUrlAuthenticationFailureHandler {
private final HttpCookieOAuth2AuthorizationRequestRepository httpCookieOAuth2AuthorizationRequestRepository;
public OAuth2AuthenticationFailureHandler(HttpCookieOAuth2AuthorizationRequestRepository httpCookieOAuth2AuthorizationRequestRepository) {
this.httpCookieOAuth2AuthorizationRequestRepository = httpCookieOAuth2AuthorizationRequestRepository;
}
@Override
public void onAuthenticationFailure(HttpServletRequest request, HttpServletResponse response, AuthenticationException exception) throws IOException, ServletException {
String targetUrl = CookieUtils.getCookie(request, REDIRECT_URI_PARAM_COOKIE_NAME)
.map(Cookie::getValue)
.orElse(("/"));
targetUrl = UriComponentsBuilder.fromUriString(targetUrl)
.queryParam("error", exception.getLocalizedMessage())
.build().toUriString();
httpCookieOAuth2AuthorizationRequestRepository.removeAuthorizationRequestCookies(request, response);
getRedirectStrategy().sendRedirect(request, response, targetUrl);
}
}
|
cs |
실패하면 에러를 담아 응답해주고 인가 요청 쿠키도 지워준다.
🌞결과 화면
구현이 잘 되었다.
생각보다 오래 걸렸는데 역시 스프링을 더 집중해서 공부해야겠다...는 생각 뿐..
코드
https://github.com/recordbuffer/Custom-er
GitHub - recordbuffer/Custom-er: 커스텀머-고객이 원하는 이미지로 직접 디자인해서 구매할 수 있는 사
커스텀머-고객이 원하는 이미지로 직접 디자인해서 구매할 수 있는 사이트. Contribute to recordbuffer/Custom-er development by creating an account on GitHub.
github.com
참고
[Spring Boot] OAuth2 소셜 로그인 가이드 (구글, 페이스북, 네이버, 카카오) | Deeplify
[Spring Boot] OAuth2 소셜 로그인 가이드 (구글, 페이스북, 네이버, 카카오)
스프링부트를 이용하여 구글, 페이스북, 네이버, 카카오 OAuth2 로그인 구현하는 방법에 대해서 소개합니다.
deeplify.dev


댓글